|

Advanced (Long Life) Air
Battery
Make
a battery that works with air and saltwater
|
NOTICE: This
science project experiment is a simplified version of the air
battery project available at
ScienceProject.com. Pictures
and excerpts of information are published here with permission.
|
Introduction:
| Batteries have been made with many different chemical compounds.
Scientists often try to make batteries that provide more energy and last
longer. Many of such high quality batteries are commercially available
today. They are used in flashlights and electronic devices such as
radios, watches, computers and calculators.
Making a battery is always an exciting science project. Your home
made batteries can be used as chemistry, physics or electricity project.
Click here to see the instructions for the Standard Kit.
|
 |
How the battery is made?
A battery is made of two different electrodes inserted in a chemical
compound. A chemical reaction between the electrodes and the chemical
compound produces electricity. For example if you insert a copper rod
and an iron rod in a cup of orange juice, that will be a battery. In
this example copper rod and iron rod are the electrodes and the orange
juice is the chemical compound or electrolyte. The problem is that the
electricity produced by such a battery is too little and has no
practical use and you cannot use it to light up a light bulb. The
saltwater battery described in this project guide can light up a light
bulb for a few seconds. When the light goes off, you can simply empty
the used salt water and add fresh salt water to get light again. By
adding a small amount of hydrogen peroxide you can get more light and
the light will last longer.
List of materials you need:
This is the
list of materials you need and come in the advanced air battery
kit.
- Four Iron Electrodes
IRON2
- Four Magnesium Electrodes
MGFLAT
- Super Bright LED light
8CR2V20MA
- Two pairs of insulated copper
wire with alligator clips on the ends
9119
- Analog multimeter with no
battery
YG188
Complete kit:
AIRBATX |
 |
Additional optional materials you may
use:
- Three or four large cups or 400ml
beakers
- Strong saltwater (Containing about
20% salt)
- Hydrogen Peroxide
|
If you don't have the materials for
this project you may order them now.
 |
| What
is a good title for my project?
You can call it
"Air battery", "Salt water battery",
"electricity from air" or "electricity from the
salt water". |
Procedure:
- Set the multimeter to 2.5 DCV so it
can read DC Voltage. (DC stands for direct current)
- Fill up a cup with saltwater to
about one inch to the top.
- Insert one magnesium electrode and
one iron electrode in the cup and make sure they are not touching
each other.
- Connect one end of the black
alligator clip wire to the magnesium electrode and connect the other
end of the wire to the black probe of the multimeter.
- Connect one end of the red
alligator clip wire to the Iron electrode and connect the other end
to the red probe of the multimeter.
- Read and record the voltage (of
your first saltwater battery).
In this battery the magnesium electrode is the negative pole. (that
is why we connected that to the black wire that is usually used for
negative). The Iron electrode is the positive pole. (That is why we
connect it to the red wire which is usually used to represent
positive).
- Disconnect the multimeter and
connect the LED light. Connect the shorter leg to the black wire
(negative) and the longer leg to the red wire (positive). Does it
light up? Record your observation.
- Repeat the steps 2 and 3 with a
second cup to make your second saltwater battery. Place that next to
the first battery.
- Use any color wire with alligator
clips to connect the magnesium of one battery to the iron of the
other battery. This is called connection in series.
- Connect the remaining iron and
magnesium electrodes to the multimeter, read and record the voltage.
(remember to use red for positive or iron, and black for negative or
magnesium).
- Disconnect the multimeter and
connect the LED light. Connect the shorter leg to the black wire
(negative) and the longer leg to the red wire (positive). Does it
light up? Record your observation.
- Repeat the steps 2 and 3 with a
third cup to make your third saltwater battery. Place that next to
the first two batteries.
- Use any color wire with alligator
clips to connect this battery to your series. remember that the
magnesium of one battery connects to the iron of the other. Now you
will have a series with three batteries.
- Connect the remaining iron and
magnesium electrodes to the multimeter, read and record the voltage.
(remember to use red for positive or iron, and black for negative or
magnesium).
- Disconnect the multimeter and
connect the LED light. Connect the shorter leg to the black wire
(negative) and the longer leg to the red wire (positive). Does it
light up? Record your observation.
- Prepare and connect the fourth
battery and repeat the same measurements and observations with the
series of four batteries.
- the magnesium of one battery to
the iron of the other battery. This is called connection in series.
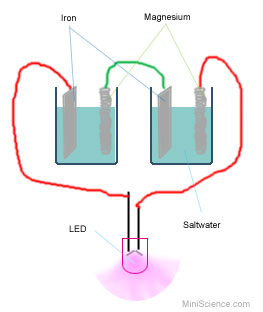
| Three saltwater batteries were
enough to light up this LED light. The light stayed on for more
than 24 hours. The long life of this battery is due to the use
of flat electrodes (that will last longer) and use of LED light
that requires less electric current.
Picture on the right shows three
air/saltwater batteries linked in series and lighting up an LED
light for more than 24 hours. |
|
How can I get more light?
- Make sure your electrodes are
not touching each other.
- Make sure there is nothing
blocking the space between the electrodes.
- Make sure that the alligator
clips are not touching the salt water.
- Both electrodes must have the
maximum possible surface contact with salt water.
The oxygen in the air
may not be enough for your demonstration and you may get a dim
light.
In this case you may add some
oxygen (in the form of hydrogen peroxide) to the salt water. That
should immediately increase the light. A cup is relatively
small. If you have access to a larger container, you will get a
better result. In a larger container, it is easier to secure the
electrodes in two opposite sides so they will not touch each
other.
| Where to buy the
material?
The main components of this
project are available as a set in MiniScience.com online store and
KidsLoveKits.com. This set will only include the essential
components. You must have plastic containers or cups, saltwater
and hydrogen peroxide to complete your materials.
Part#
AIRBATX |
|
The electricity
produced in this way may be used to light up an LED
light for more than 24 hours.
Identifying the
polarity or direction of electricity is especially important when
you are trying to light up an LED.
Each LED has 2 legs.
One is longer than the other. The longer leg must be connected to
the positive pole of the battery or Iron. The shorter leg must be
connected to the negative electrode or Magnesium.

Back
to the list of projects
Does it really work?
Although a saltwater battery is not as strong as a real battery, it
can produce visible light on a low voltage light bulb. It is also safer
than batteries that use many harmful chemicals.
What chemicals do I need?
The only chemical that you need is Sodium Chloride (NaCl) also known
as table salt. This is the chemical that you usually have it at home. If
not, you can buy it from grocery stores. Good quality, pure and
inexpensive packages of salt are often marked as kosher salt. You also
need water (H2O).
How does it work? What is the chemical
reaction?
When Iron and magnesium are placed in
water, multiple chemical reactions happen that contribute to the
movements of electrons from magnesium electrode towards iron
electrode. During these processes Iron electrode oxidizes to Iron
oxide and magnesium electrode reduces to magnesium hydroxide.
Here's what is happening in more
details:
- Magnesium have a tendency to react
with water and form magnesium hydroxide. To do this each magnesium
atom must lose one electron (and become Mg+ ions). While the
magnesium electrode is loosing electrons it will form the negative
pole.
- The electrons from the magnesium
atoms combine with the hydrogen ions in the water and form H2
molecules (Hydrogen gas). We see the hydrogen gas as bubbles forming
on the magnesium.
- On the other electrode, the iron
that is oxidized by air and is now in the form of Fe++ ion needs to
receive two electrons to change back to iron. This will create
shortage of electrons in the iron side and make the iron a positive
pole.
|