
Air
propulsion Motor Boats
(Simple Electric
Circuit)
Please verify and compare the content of
your kit with the list below. This kit is updated as of March 1st, 2008.
The new content include:
- Simple Switch (knife switch)
- Electric motor
- Insulated Wire
- Plastic Propeller 4"
- Plastic Propeller 5"
- Battery holder for 2 AA
batteries
- Screws 6
- 4 wheels
- 2 wooden axle rods 6"
- 2 Plastic Straws
- Design Grid
|
 |
If any thing is missing, please call
(973)777-3113 immediately and send us an email at info@MiniScience.com.
Simple Electric Circuit
The battery and the electric motor used in
this project will form a simple electric circuit. Connections are possible
in many different ways.
| In the simplest form, you connect
the two wires of the battery holder directly to the electric
contacts at the back of the electric motor. |
 |
| In a standard design you will use
one battery holder, one switch and one electric motor. One wire from
the battery holder connects to the electric motor directly. The
other will connect to the switch and then another wire from the
switch will connect to the electric motor. |
 |
| In a more complex design you may
use two battery holders and install the switch between the two
battery holders. |
 |
Note: The electric motor is
able to spin in two different directions. You can reverse the direction of
spinning by switching around the wires connected to the motor.
Additional materials you need:
- Styrofoam board from hardware store
- Utility knife to cut the foam board
- Acrylic water based paint to paint the
foam
- Wood glue or Elmer glue to connect the
foam parts
- Nails with diameter less than the hole
on the Wheels
- Wood block (optional)
Make
Car-Boat Hybrid Machine
|
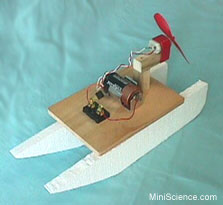
Combine the joy and excitement of
mechanical toys with your science project by constructing an air
propelled motor boat. This is also a good way of learning about
simple electric circuits. Your boat will have a battery, a switch and a
motor with propeller. This can be used as a science project related
to electricity, force or floatation. This idea is good for a display
project, an engineering project and an experimental (investigatory)
project. The main structure is
made of Styrofoam board that is available at hardware stores and home
improvement stores. |

|

Sample Purpose:
The purpose of this project is to see if the
size of propeller affect the speed of the boat.
Sample Hypothesis:
I hypothesize that the size of propeller has a
direct relation with the speed. In other words the boat drives faster at the
same ratio the length of the propeller is increased.
Design Your Boat:
Styrofoam is a very light material and
easily floats on the water. The design of your boat can be as easy as a
rectangle piece of Styrofoam or as complex as you wish. Styrofoam pieces can
be glued to each other using wood glue or white glue. Sketch your ideal
design on a paper before you start. It will be easier to connect the wheels
if your boar is about 5 inches wide or narrower. To connect the wheels
you must designate the parts to hold the axle. Axle holders can be two 1/2"
wide strips of Styrofoam glued at the bottom of the boat.
| Procedure:
Start by cutting the foam. You can
cut the Styrofoam easily with utility knives. Just practice for a few
minutes and you will get the grip on it. Hold the knife in a sharp
angle and don't push too much. You may need to go over the same line a
few times until you get a clean cut.
Styrofoam boards can be glued using white
glue or wood glue. They can also be painted using any latex paint or
water based paint.
|
 |
| Feel free on making your
own design. Just reserve a place where you can place the electric
motor and secure it with tape.
Battery is a heavy piece; it must be
centered in order for your boat to have a balance on water.
Adjustments may be made by placing other heavy objects onboard.
|
 |
| Please note that with this
method you are not restricted to a boat. You may also make a car that
drives by pushing the air backward. You just need for wheels and four
nails. Make sure that the wheels are large enough and can spin freely.
To hide the battery and switch, you
may also use some cardboard to make a cabin and place it over those
parts. |
 |
| The boat that you see in
the picture does not have a steering mechanism. You may try different
possible methods to construct a steeling mechanism in your boat. Finally you can make a vehicle
that can drive both on land and in water. To do that simply attach the
wheels to the sides of the boat.
With your kit you may also receive
four wheels (same size or in two different sizes).
|
|
|
If you did not get wheels in your
kit, use the wheels of any plastic toy car instead. To connect the wheels
first make holes that must hold the axle. Then insert a piece of plastic
straw in each hole. Finally pass the axle rods through the holes and
connect the wheels.
The plastic
straws are used to reduce the friction between the axles and the
Styrofoam. |
 |
Wheels are added as a bonus to some of the
kits purchased in the beginning of the school year. Material that comes with
the kit may be used in many other projects as well.
|

Knife Switch
|

Electric Motor
|
|
Propeller  |
|
|

Wire
|
|
Other
materials in the kit include the Design Grid, the Axle Dowels,
Plastic Straws, Wheels |
|
|

|
Screws are used to hold the switch,
light base or battery holders in place.
You may receive one battery holder for
2 AA batteries or two battery holders, each for one AA battery. |
 |
| Two pictures of a simple
air propelled electric car. With some creativity and artwork you can
make this a must better project. |
 |
 |
| The Kit Contains the
electric motor, simple switch, battery holder, wire, light bulb, screw
base for light bulb, wire, screws and propeller.
You will need additional material and
tools such as Styrofoam board, wood, nail, water color, screw driver,
battery and utility knife.
Simple Electric Circuit
Part#KITCB
|
 |
|

